
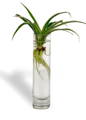
This ornamental trailing plant commonly known as the spider plant is a family favorite due to its resilience to subtle environmental (temperature, light, etc.) imbalance. The Spider Plant features a bushy mane of long grassy green-and-white striped leaves with a subtle yellow outline. Another great benefit to owning a Spider Plant is its air-detoxifying powers that can remove toxins in just 24 hours.
Native to South Africa
Asparagaceae
We know this unique plant as the Spider plant, but its official botanical name is Chlorophytum comosum bonnie. The Spider plant is also referred as the Airplane plant, Ribbon plant, and Spider ivy.
There are over 60 known varietals of spider plant. A few common varietals include Chlorophytum Comosum ‘Reverse Variegatum’ (Reverse Spider Plant), Chlorophytum Laxum (Zebra Plant), and Chlorophytum Comosum (Bonnie Plant).
Non-poisonous to pets, but mildly toxic to cats if ingested
For healthy plants, we recommend that you add water to the glass every 1 - 2 weeks (or if you see that water levels have lowered) to replenish the water that evaporated or absorbed from the plants. Then, replace the water every 2-4 weeks.
Most tap water works great but distilled or filtered waters are recommended if available.
One drop of nutrients every month, otherwise every 2 months. If you see a new leaf forming, we recommend adding 1 to 2 additional drops of nutrients to support the development of the new leaf.
Spider plants enjoy bright, indirect light. Too much direct light can cause brown tips to form at the end of the leaves.
Ideal temperatures for the spider plant range between 60 to 75 degrees fahrenheit. If you're growing these in water in your home, an easy rule of thumb is, if you're comfortable, so if your spider plant!
Spider plants comfortably grow in regular to high humidity environments.
Spider plants are best propagated as pups from a mother plant. As spider plants mature, they long stocks will shoot off where little clusters of baby spider plants form. Propagation is as simple as popping off the pup from the primary plant and submerging its roots in water. Root growth generally just takes a few weeks, at which point a strong, healthy spider plant is born.
Identification: Appears as if the tips of the leaves have been burned off
Cause: too much sunlight, insufficient humidity levels, chemicals in the water
How to Treat: Cut off the brown tips as they appear and adjust the light, humidity, or water quality. If issue persists, try switching to distilled or filter water
Identification: You'll have to look close, aphids can look a bit like dirt and mealy bugs are identified by the wisps of cotton-like webbing they leave around. Spider mites, well, they look exactly as they sound.
How to Treat: You can wipe off pests with cotton balls dipped in rubbing alcohol. Periodically showering the plant with water and applying insecticidal soap will help keep pests at bay
Identification: Signs of root rot are yellow leaves, a rotten smell, and/or mushy roots.
How to Treat: Plants with root rot can be saved if you catch them in time! You'll want to remove the rotting roots with clean, sterile knife/scissors, leaving the healthy roots intact. Once removed, dipping the plant in a hydrogen peroxide solution (50% water, 50% hydrogen peroxide) is a great way to both sterilize and kick off the process of new root growth.